When I saw a tutorial for a rainbow travel pillow over on Prudent Baby I knew it would make a perfect hair bow holder. Last week I finally got around to making it for my sweet girl for Christmas. To make this bow holder you'll need:
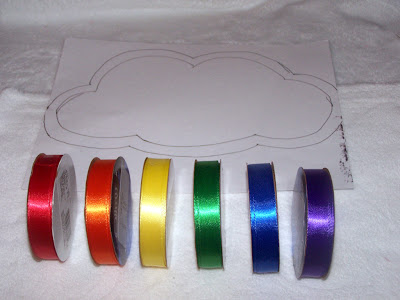
- Ribbon in the colors of the rainbow. 2 in each color - 1 at 5/8" and one smaller
- 3/8 yd White fabric. I used a plush, cuddly fabric that reminded me of clouds, but you could use almost anything. You'll have lots left over. Probably enough to make 2 more clouds.
- Buttons in the colors of the rainbow (I chose a sweet flower shape, but any reasonably sized shape will work.
- Beads in the colors of the rainbow
- Stuffing
- Cloud pattern or draw your own
Measure (or add) the width of your ribbons to be sure they'll fit on your cloud.
Cut your ribbon to the desired length. I started with about 17 inches so that I had plenty of room to trim them evenly at the end. Place the thin ribbon on top of the wider one and center. Also cut a piece of yellow ribbon for your handle to your desired length.
For each color, glue the thinner ribbon to the wider one on only one end with just a small dab of fabric glue.
Prudent Baby has another step which uses heat n bond to keep the ribbons in place while sewing and I think it's a great idea. I wish I had reread her tutorial prior to making this.
Download my cloud pattern here or make your own . If you download my pattern you'll find the shape differs slightly from the one I made because I decided the bottom should be a bit more straight and the top should be slightly less curved since the ribbon handle pulls upward just a little while hanging. You could also use the one from Prudent Baby, which is super cute, and just shrink it a bit.
Trace it onto your white fabric using a vanishing fabric marker making sure your fabric is doubled so you'll end up with two pieces and cut.
If you squint you just might be able to see the cloud outline.
Place one cloud piece right side up on the table. Then arrange the ribbons how you like on top of the cloud piece but backwards so that the ends that will hang down point towards the inside of the cloud. If this is confusing you can again refer to the Prudent Baby tutorial (she's a pro and her tutorials are so easy to follow - I'm still learning). Lay the handle in place on top of the cloud piece with the ends touching the edge of the cloud fabric and the handle portion facing the middle of the cloud (it should look like a u). Lay the other cloud piece on top with the right side down.
Here you see the ribbons pinned inside the cloud pieces.
Sew using a 1/2" seam allowance making sure to leave a few inches open on one side to turn it right-side out. I stuffed it enough to hold it's shape, but not so full that it is puffy, which might make it lay funny against the wall. Then sew the hole closed. Close the turn hole with a hidden stitch for a seamless looks. Check out this tutorial here if you need help with this step. I trimmed the ribbons so they were even and touched them with fray check. You could also use a lighter (briefly and carefully) or pinking shears to prevent the ribbon from fraying. Choose where you want your buttons. You could line them up straight across the ribbons in neat rows or stagger them like I did. Sew the buttons on to the top of the smaller ribbon so that you're sewing the two layers of ribbon together. I then strung a few beads in coordinating colors and sewed them through the bottom of the ribbons.
Hang your bow holder, clip your bows to the skinnier ribbon and you're done! I absolutely love it. And I think it looks great in her room. If you know my little girl, you know she's a bit lacking in the hair department so this bow holder may be wishful thinking for now, but when her hair does come in I'll be ready!
Remember, I am new to this tutorial thing and only an average sewer. If you find an error, an overlooked step, or an easier way to do something please let me know. Part of the reason I am blogging is to learn and grow. Now go make a Rain-Bow Holder for the special girl in your life and stay tuned for a simple headband holder tutorial coming up after Thanksgiving.
Tell me, how do you keep all your little girl's accessories in order?


That is adorable! Without the beads, it would also make a good taggie-type toy for a baby gift! I'll have to remember this.
ReplyDeleteThanks, Jenny! It would be a great taggie toy - and so easy.
DeleteWhat a very sweet idea for a little one!
ReplyDeleteThanks! I visited your blog and I love your toilet paper roll criminals. Very fun.
DeleteHey Rachel, this is so cute. I made something similar, but a ballerina!
ReplyDeleteThanks so much for linking up and linking back at last week's Humble Brag. Hope to see you back today to link up more great projects and maybe win ad space. We are also starting a giveaway today for a SILHOUETTE CAMEO!! Hope to see you there!
http://www.oneprojectcloser.com/giveaway-and-humble-brag-link-party-9