Monday, February 4, 2013

Happy New Year Card


I'm baaaack!  Yay.  I needed a blogging break, but I did miss it so and I'm happy to be back.  Did you get busy with the holiday season and miss the opportunity to send Christmas cards?  I did!  It seems like it was Halloween and then Christmas Eve.  I kept waiting for the perfect opportunity to take a holiday photo.  But with a capricious three year old we were constantly battling his visible physical injuries.  First he had a black eye, then he cut his own hair, then it was a fat lip and another haircut - oye!  The moral here is that there will never be a perfect time for a photo and with Photoshop and other editing software I could always edit it if it bothered me.  I must remember this next year.

Regardless of your excuse the reason you didn't send Christmas cards, it's never too late to let your friends and family know you're thinking of them.  New Year's cards are a great way to wish your loved ones well in the coming year.  For our card I cut the letters H-A-P-Y our of red construction paper and then used a glue stick to adhere them to a piece of white card stock.  I took a bunch of photos of everyone with their letter and then used Picasa to edit them and make them black and white.  I then used the collage function to line the pictures up the way I wanted.  Once I made the collage I added text (still using Picasa).  I cropped the image to 4x6 for easy printing..  We saved a ton of money by simply printing them at Walgreens just like you would a regular photo (instead of printing them on one of the online card making sites).  And we were able to pick them up the next day!  Then I raided my stash of envelopes and stuck them in the mail.  I also sent some via email.

Here's the text in case it's hard to read on the small photo:
We didn't send Christmas cards in December
But that doesn't mean we don't remember
Our friends and family who mean so much.
In 2013 let's keep in touch!

Wishing you peace, love and joy in the new year.

And I'll take this moment to wish you all peace, love and joy in the new year.  Have you ever sent a Happy New Year card instead of a Christmas card?

Tuesday, January 1, 2013

Happy New Year

I have taken some time away from my blog to enjoy some time with my family during the holidays.  What wonderful holidays they were.  I hope you are enjoying your holidays.  And I hope you'll continue along for the ride in 2013.  I have a lot of fun things planned and I'll be back soon!  Until then xoxo.

Tuesday, December 11, 2012

Butternut Squash Pot Pie


I love fall.  I mean, what's not to love - colorful leaves, crisp air, warm hot chocolate, cozy fires and delicious seasonal veggies.  Ahh, yummy fall veggies, my favorite of which is definitely butternut squash.  It's beautiful to watch grow in the garden, it has a great shelf life and it tastes like candy.  This recipe has only 7 ingredients and is quick and easy.  There's a whole lotta comfort packed into this pie so it's great to take to potlucks, new parents or those going through tough times.  Roasting the squash takes the most time, but it can be done the night before.

Butternut Squash Pot Pie (Vegetarian)
(click here for the printer friendly version)

1/2 of a small butternut squash (roasted and peeled, which can be done ahead of time)
1 (10.75 oz) can condensed cream of potato soup
1- 16 oz package frozen mixed vegetables (green beans, carrots, peas, corn)
1/2 cup milk
1/2 tsp dried thyme
1/4 tsp nutmeg
1 package of refrigerated pie crusts

1.) I prefer to roast my butternut squash.  Preheat oven to 425.  Line baking sheet with foil and spray or butter foil.  Cut squash in half lengthwise and remove seeds.  Tip: If you have trouble cutting the squash you can microwave it for 5 minutes first.  Lay squash cut-side down and cook for approximately 45 minutes.

2.) While squash is roasting, steam the veggies just to thaw.

3.) In a medium size bowl combine veggies, potato soup, milk, thyme, nutmeg and pepper.


4.) Prepare pie crust according to instructions.

5.) Remove squash from oven and allow to cool a bit so you can handle it.  Remove skin and cube the squash.  Gently fold into the veggie mix.


6.) Preheat oven to 375.

7.) Pour veggie mix evenly into first pie crust.  Top with second pie crust.  Trim and crimp edges. Make slits in pie crust and embellish if you wish.  I embellished this pie, but truthfully I usually just poke fun holes that make a shape and we laugh about it once it's baked.*  Bake at 375 for 40 minutes.  Allow to cool for about 10 minutes before serving.


 I like to serve with a spinach salad topped with feta and plum tomatoes, but whatever floats your boat.


*Tip: If you choose to embellish your crust you will want to cover your pie with foil in order to avoid burning the embellishment.  Put a slit in your foil.  Remove foil after about 30 minutes and cook for an additional 20 - 25.


This is a vegetarian pot pie and I promise that you will not miss the meat.  If you are worried about it just add some chicken.  I made two of these for a group dinner and cut up a rotisserie chicken and added it to one of the pies (trust me, you don't want me cooking your meat).

You may have seen this post on Sugar Bee Crafts during her Guest Post Extravaganza.  Check out Mandy's fantastic blog for great crafts, yummy recipes and fun tips and tricks.

Thursday, November 29, 2012

Headband Holder from Oatmeal Container

Hey folks!  I'm blogging over at Sugar Bee Crafts today at 3 p.m. so be sure to check out my recipe for mouth-watering Butternut Squash Pot Pie.  Thanks to my friend Katie at Off The Hook Crochet for her help with the photos for that post.

Now, as promised here's my headband holder tutorial.


I love crafts of the trash-to-treasure variety.  It feels good to make something purdy from something otherwise destined for the recycling bin.  This is one of my favorite projects so far and it's the perfect time of year to make it.  This requires a HUGE oatmeal container.


See that?  42 oz of Oatmeal! That could take a long time to go through, but a few batches of yummy oatmeal cookies this holiday season and you'll finish it in no time.

Peel the label off so it won't show through your fabric.


I chose to cover mine in burlap, but you could use almost any fabric, paper, or wallpaper.  If you use burlap find the somewhat finished end.  That will be the top of your container.  I trimmed the burlap so it was easier to work with.


Once your glue gun is hot put a bead along the top of the container just under the lip where the lid goes.


Work your way around the container until all the fabric is attached along the top.


I decided to use spray adhesive to attach the rest of the of the fabric so I moved the project outside.  Working in small segments spray the adhesive and smooth the burlap as you go.


Trim the excess off the bottom and using spray adhesive tuck the ends.


Am I the only one who can't use spray adhesive without being covered in the stuff by the time I finish?


I decided to finish the bottom by adding a circle of paper using regular glue.  This step is totally optional as you'll never actually see it.  


Put the lid back on and glue a fabric flower, crocheted flower or other topper.  Put your headbands on.  There you have it!  


You can store hair bows, hair ties or other accessories inside the container.  Who doesn't love hidden storage?  If you make this let me know.  I'd love to see pictures!  What are you upcycling these days?

Monday, November 19, 2012

Rainbow Hair Bow Holder


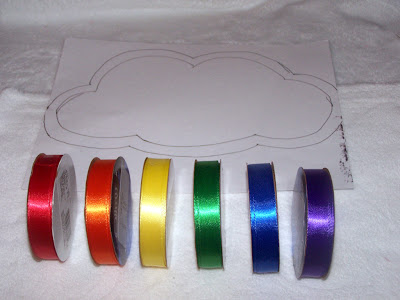
When I saw a tutorial for a rainbow travel pillow over on Prudent Baby I knew it would make a perfect hair bow holder.  Last week I finally got around to making it for my sweet girl for Christmas.  To make this bow holder you'll need:

  • Ribbon in the colors of the rainbow.  2 in each color - 1 at 5/8" and one smaller
  • 3/8 yd White fabric.  I used a plush, cuddly fabric that reminded me of clouds, but you could use almost anything.  You'll have lots left over.  Probably enough to make 2 more clouds.
  • Buttons in the colors of the rainbow (I chose a sweet flower shape, but any reasonably sized shape will work.
  • Beads in the colors of the rainbow
  • Stuffing
  • Cloud pattern or draw your own
Measure (or add) the width of your ribbons to be sure they'll fit on your cloud.  


Cut your ribbon to the desired length.  I started with about 17 inches so that I had plenty of room to trim them evenly at the end.  Place the thin ribbon on top of the wider one and center.  Also cut a piece of yellow ribbon for your handle to your desired length.


For each color, glue the thinner ribbon to the wider one on only one end with just a small dab of fabric glue.


Prudent Baby has another step which uses heat n bond to keep the ribbons in place while sewing and I think it's a great idea.  I wish I had reread her tutorial prior to making this.

Download my cloud pattern here or make your own .  If you download my pattern you'll find the shape differs slightly from the one I made because I decided the bottom should be a bit more straight and the top should be slightly less curved since the ribbon handle pulls upward just a little while hanging.  You could also use the one from Prudent Baby, which is super cute, and just shrink it a bit.


Trace it onto your white fabric using a vanishing fabric marker making sure your fabric is doubled so you'll end up with two pieces and cut.  

If you squint you just might be able to see the cloud outline.

Place one cloud piece right side up on the table.  Then arrange the ribbons how you like on top of the cloud piece but backwards so that the ends that will hang down point towards the inside of the cloud.  If this is confusing you can again refer to the Prudent Baby tutorial (she's a pro and her tutorials are so easy to follow - I'm still learning).  Lay the handle in place on top of the cloud piece with the ends touching the edge of the cloud fabric and the handle portion facing the middle of the cloud (it should look like a u).  Lay the other cloud piece on top with the right side down.

Here you see the ribbons pinned inside the cloud pieces.

Sew using a 1/2" seam allowance making sure to leave a few inches open on one side to turn it right-side out.  I stuffed it enough to hold it's shape, but not so full that it is puffy, which might make it lay funny against the wall.  Then sew the hole closed.  Close the turn hole with a hidden stitch for a seamless looks.  Check out this tutorial here if you need help with this step.  I trimmed the ribbons so they were even and touched them with fray check.  You could also use a lighter (briefly and carefully) or pinking shears to prevent the ribbon from fraying.  Choose where you want your buttons.  You could line them up straight across the ribbons in neat rows or stagger them like I did.  Sew the buttons on to the top of the smaller ribbon so that you're sewing the two layers of ribbon together.  I then strung a few beads in coordinating colors and sewed them through the bottom of the ribbons.


Hang your bow holder, clip your bows to the skinnier ribbon and you're done!  I absolutely love it.  And I think it looks great in her room.  If you know my little girl, you know she's a bit lacking in the hair department so this bow holder may be wishful thinking for now, but when her hair does come in I'll be ready!


Remember, I am new to this tutorial thing and only an average sewer.  If you find an error, an overlooked step, or an easier way to do something please let me know.  Part of the reason I am blogging is to learn and grow.  Now go make a Rain-Bow Holder for the special girl in your life and stay tuned for a simple headband holder tutorial coming up after Thanksgiving.

Tell me, how do you keep all your little girl's accessories in order?

Linking to: Make Something Mondays, Craft-O-Maniac, Just Something I Whipped Up at Project Inspire, Made By You MondaysRomantic Home, Chic on a Shoestring Decorating, The Humble Brag at One Project Closer, Tatter Tots & Jello, Sew Cute Tuesday, House of Hepworths

Homemade Projects ~ Add Yours! {11-20} The Shabby Nest

Friday, October 26, 2012

Last Minute Kid and Family Halloween Costumes


Here is a roundup of some easy, fun Halloween costumes. Most of these can be made last minute so you still have plenty of time. After all, last minute is 10 p.m. on October 30th, right?

Mama and Baby Zebra and Zookeeper
So this one probably required the most legwork, but you could easily get some faux fur and just stick it to a black sweatsuit for both mama and baby.  The baby zebra was found at a consignment shop for less than $10.  The dress for mama zebra I found at a consignment shop.  I found the hat and gloves at Target and the legwarmers were either from Target or a Halloween shop.  The zookeeper was super simple with brown pants, khaki shirt and hat.  We covered the logo on the hat with a made up zoo logo and put on a zookeeper name tag.  It was fun and we got TONS of compliments.  I think it was pretty cute if I do say so myself.


zebra love


No Sew Spider and Web - great for baby wearing!
I knew I'd be wearing my 2-month-old last year so it didn't make much sense to put her in a costume that no one would ever see.  So this costume was perfect.  We got SOOOO many complements.  I bought a white sheet at the Goodwill Outlet Center, which means I paid maybe 25 cents for it!  I cut it so it wouldn't drag on the ground and then cut a head hole in the middle.  I didn't bother to hem it or sew around the head hole.  Then I laid it on the floor and used a large tip sharpie to draw the web.  I cut a black oval out of felt for the spider body and simply pinned it to the sheet in the appropriate spot.  I gathered some long socks in fun coordinating prints (you could do all black of course but I like the whimsy of the prints) and stuffed them with some cheap stuffing.  Then pinned each end where I wanted them on the sheet.  I found a black kids hat for $1 at Target and cut out some white circles out of felt and some smaller black felt circles for the eyes.  I glued the eyes to the hat using fabric glue.  She wore the hat backwards.  We were both warm and everyone loved the costume.


Diver 
Leon loves the ocean and when we discovered Jonathan Bird's Blue World on PBS he was hooked.  We even ordered the DVD of season 3.  He was torn between being a garbage man again or a diver.  We both ended up having a lot of fun with this costume.  We had purchased a wet suit (aka sunsuit) for his birthday and he wore that with pants and long sleeves underneath.  I again perused the Goodwill Outlet Center and was thrilled to find the perfect vacuum tube and a cool looking gauge that was attached to a blue tube.  Then I sprayed a large Gatorade bottle with flat black spray paint.  I attached the vacuum tube to the Gatorade bottle with black electrical tape.  I then attached it to a small backpack using the backpack's straps, but you could easily tape it with the electrical tape or attach some straps right to the bottle.  I also bought him a swim cap, but he only wore it a little (I think it pulled on his long hair) and he had goggles (not sure why they are not in the picture).  I attached the "air gauge" to the front of the vacuum tube using the black electrical tape.  I also cut out flippers with black felt and secured them to his shoes with electrical tape.


Strong man/french painter 
This was super easy.  I picked up a men's t-shirt at Goodwill and cut the shape I wanted out of the neck.  Then I cut up the sides and sewed them back smaller to fit him like a jumper.  I sewed legs into the bottom of the shirt and padded his arms with stuffing.  He had dumbbell, which we made by painting a wrapping paper tube black and then taping 2 black balloons to each end with electrical tape.  He didn't carry it around much.  It inhibited his worldly exploration.


Baby Yoda
I sewed the hat out of fleece.  I basically cut the ear shape (yes, I realize they are a little long, but they are still so cute!) and traced a regular hat that fit him.  Then I placed the right sides of the hat together with the ears in between and sewed it all up.  When I turned it right side out it was done.  I think I hemmed the bottom.  I then took a girls t-shirt, size 6), cut it down the middle and wrapped it across his front so it looks kind of robe-esk.  I pinned it in place.  E-Z!


Garbage man and trash and recycling
Here's another no sew costume.  Our son loves all things waste management.  You can read more about his beautiful relationship with out former garbage man (who became our dear friend) here.  He was so excited about this costume.  I knew it had to be perfect.  Our garbage man, Harold, had given him a set of their gloves and the coolest official Waste Pro hat.  I purchased a t-shirt similar to the color our company wears and the used an iron on transfer to add the logo to the front and back.  I used strips of duct tape to make the reflective strips.  I picked up two pillowcases, one black, one blue, from a local fabric outlet and again used iron on transfers to add to recycling symbol and a trash symbol.  He used those as his treat bags.  My husband went as recycling and I went as trash.  As you can see we basically just put bags on us and then stuck trash and recycling to the bags.  It was simple and fun.  Before he started kindergarten he wore his costume every trash day.


This year our boys are going as Fred and Shaggy and our neighbor girls will be Velma and Daphne.  It should be a lot of fun.  Here are a few other fun ideas I've come across:

I LOVE this Box of raisins - from Bear Rabbit Bear Crafts
This Target costume from Family Fun is simple and cute
Here's a fun voodoo doll posted on the crafster.org forum
Try a cheap and easy paper doll like this one here
Here are five fun ideas - the gore unzipped is both incredibly gross and intriguing

Enjoy and good luck.  Most importantly, have fun with it and let you creativity flow.  What last minute costumes have you come up with?

The Shabby Nest